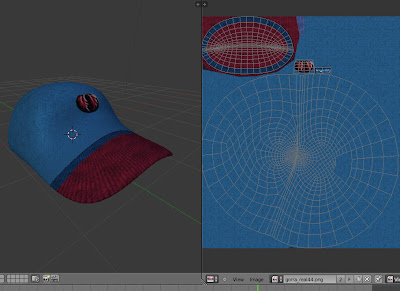
-A cap.blend or a cap.dae file. I made a cap hat in Blender, see post here....
-And for using it in Cloud Party the cap must be rigged, so download and unzip Cloud Party avatar from the Avatar Development kit page here.
(Look for .blend files on it, sometimes there are not .blend files in the lastest releases, so you can take from my Dropbox here. Sorry I can remember where I took them for giving due credit).
Texturing cap:
1. Launch Blender 2.64a...File/open/cap.blend
2. Go to "edit mode" and split screen by dragging cursor on the top workspace border until the split option appears.
Choose UVmap editor in the new workspace you have now, and click on Image/new image/Ok.
3. Separate zones in the modeled cap so you can apply different color or textures more easily.
Go selecting vertexes:
RC on first vertex and Shift-Alt-RC for add in entire lines of them.
Hit "A" for selecting all.
Hit space bar and type seam/choose "mark seam".
Hit space bar and type unw/choose "unwrap". Hopefully you may see the unwrapped UV map now.
If not: Click on Image/new image/Ok and/or UV/unwrap .
4. That image you can work on by editing apart from Blender, so:
-Image/save image as cap.png
or
-UVs/ Export UV layout.
Both ways will save image to HD.
5. Open cap.png on your fav image editor and texture it as you like (color, patterns...).
Save for the web as a .png file.
6. Back on blender Image/load image/cap.png (just textured).
7. Go to texture mode in the 3d screen and the texture will load in the cap.
At this point you have a textured mesh object you can export as Collada.dae for using in SL and Opensim too. Just upload it as a mesh and attach as any other. (Do mark "Apply Modifiers", "only selected", "include UV textures" in the export options tab)
For using in CP we still need to rig the cap for the CP avatar:
So you have the hat opened in blender and your downloaded CP avatar folder somewhere in your HD.
1. On Object mode go to File/Append....navigate to the CP avatar.blend files folder. Look for Object folder and select all this 3 "Armature", "head" and "hair" .
2. Move , rotate and scale the cap over the avatar head.
3. Do Shift-RC on armature over avatar head so now both cap and armature are selected.
6. File/ Export/Collada.dae. Be sure to get checked "include Armature" , "Selection only" , "Apply Modifiers", "Only Active UV layer", "Include UV Textures" and "Include Material Textures".
Click on "Export COLLADA".
Log in CP:
1. Create new palette.. name it Cap.
2. Click on Upload button...drag and drop the cap.dae file and the cap.png textured file from HD.
3. Click on "create" button/ custome...name it cap. Ok.
4. Click on "create" button/ material...name it cap_mat. Double click for edit. Click on "diffuse" box and select cap.png texture. Save and Close.
4. Double click on costume cap icon for editing:
-Costume type: female
-Slot: accessory hat
-Mesh tab: cap.dae
-Transform tab: Attach :hat
Now click on Save but not close custome edit window. Close building window instead.
12. Now click on Outfits button in cell phone...Acessories...Hat...Cap.
The cap may appear to some far distance over your head.
Use Offset for positioning it in the right place.
13. Save and close.
Disclaimer: Just sharing as I go learning in the by so you may encounter some inaccuracies in my tutos. Corrections are welcome.
Key words: how to texturing uploading mesh to cloud party blender tutorial


No hay comentarios:
Publicar un comentario